
Thursday, December 18, 2008
Tuesday, December 9, 2008
Semi Transparent Type Tutorial
Step 1: Open the image of your layer choice. Press T to get the type tool and enter your text.
Step 2: Put a selection around your text. Hide your text layer by cliking on the eye icon. Click on your image layer.
Step3: Press Apple+ J. Add a drop shadow Inner shadow and Inner glow effect using your layer styles.
Step4: Drag your orinagl type layer into the trash.
Thursday, December 4, 2008
Painting Away Color Tutorial
My version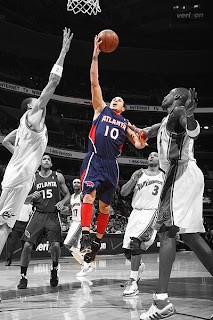 Oringal
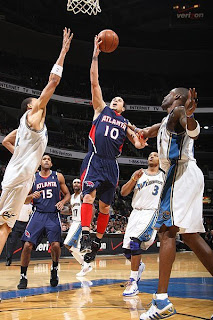
Step1: Open the image you would like to work on.
Step2: Click on the brush tool. In the options bar,switch the blend mode to color. Change your foreground color to black.
Step3: From the brushes palette, choose a medium sized,soft-edged(0% hardness) brush.
Step4:Start painting. As you paint, the color will disappear leaving your image in grayscale.
 Oringal
Step1: Open the image you would like to work on.
Step2: Click on the brush tool. In the options bar,switch the blend mode to color. Change your foreground color to black.
Step3: From the brushes palette, choose a medium sized,soft-edged(0% hardness) brush.
Step4:Start painting. As you paint, the color will disappear leaving your image in grayscale.
Wednesday, December 3, 2008
Shadow In Motion Tutorial

Step1: Tp the letter ''d'' to change your foreground color to black. Hold down the Options key and tap the delete key. Type your text using a medium gray(#666666).
Step2Duplicate yor text layer by using the apple+j shortcut. Rasterize your layer.
Step3: Go under the filter menu, under pixeate choose fragment. Run yhis filtre two more times by using the apple+f shortcut.
Step4: Press apple+t. In the options bar change the width + height to 130%.
Step5: Click on your oringal type layer and rasterize it. Click on the top layer and press apple+e to merge the two layers.
Step6: To colorize your type layer press apple+u to bring up hue/saturation. Click on the colorize checkbox and move the hue slider to the color you'd like.
Photoshop Shortcuts
Apple+ U= Hue and saturation
Apple+T= Free transform
Option+Delete= Changes color of image to your foreground color
Apple+J= Duplicate layer
Apple+E= Merge
Apple+F= Run the last filter
Apple+S= save
Apple+V= paste
Apple+C= copy
Apple+A= select all
Apple+D= Desslect
Apple+N= New Document
Apple+T= Free transform
Option+Delete= Changes color of image to your foreground color
Apple+J= Duplicate layer
Apple+E= Merge
Apple+F= Run the last filter
Apple+S= save
Apple+V= paste
Apple+C= copy
Apple+A= select all
Apple+D= Desslect
Apple+N= New Document
Subscribe to:
Posts (Atom)